In this blog, we are going to see how we can create our own custom Sling job queue for a pool of job topics.
AEM provides a factory conguration which is responsible for this.
Go to your localhost:4502/system/console/configMgr and search for "Apache Sling Job Queue Configuration"
Provide the following field values:
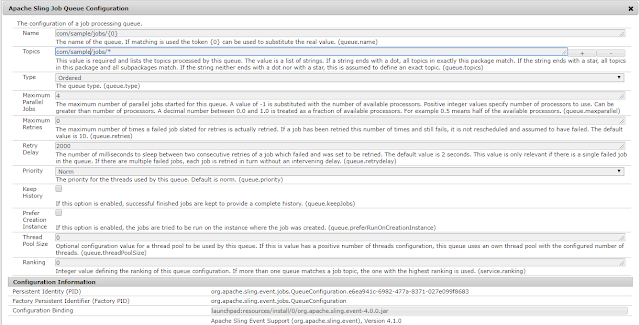
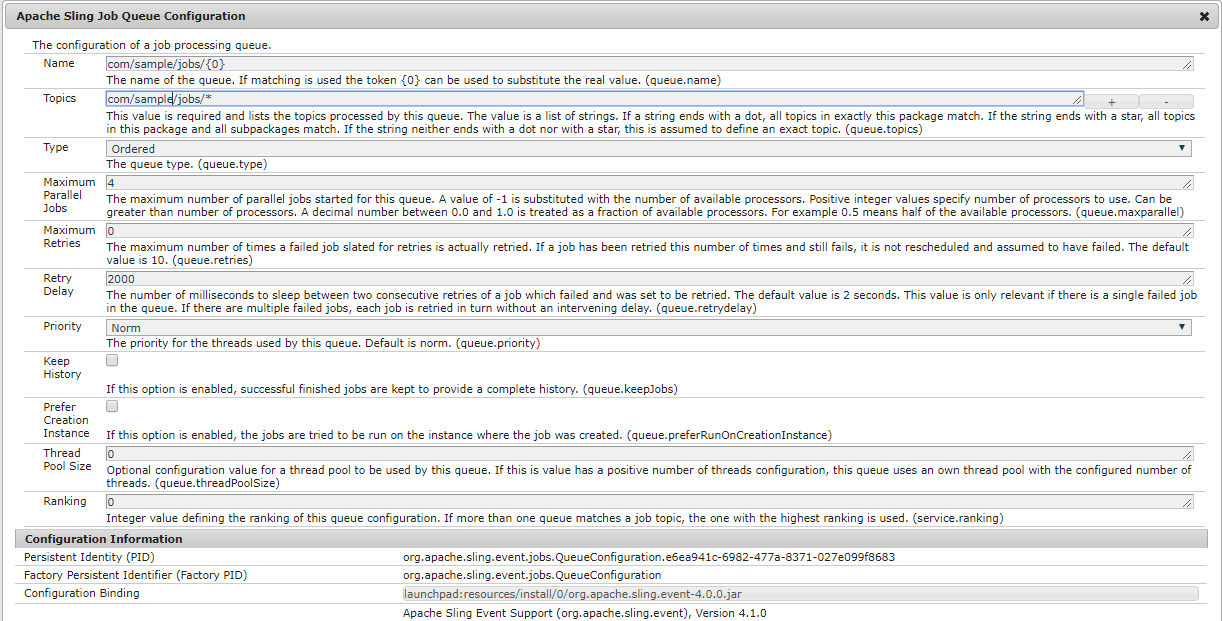
Name: The name of the queue. If matching is used the token {0} can be used to substitute the real value.
Topics: This value is required and lists the topics processed by this queue. The value is a list of strings. If a string ends with a dot, all topics in exactly this package match. If the string ends with a star, all topics in this package and all subpackages match. If the string neither ends with a dot nor with a star, this is assumed to define an exact topic.
Type: The type of queue it can be parallel, ordered or Round Robin
Maximum Parallel Jobs: This will tell how many jobs can run in parallel. This value can be decided by the available number of processor
Maximum Retries: The maximum number of times a failed job slated for retries is actually retried. If a job has been retried this number of times and still fails, it is not rescheduled and assumed to have failed. The default value is 10.
Retry Delay: The number of milliseconds to sleep between two consecutive retries of a job which failed and was set to be retried. The default value is 2 seconds. This value is only relevant if there is a single failed job in the queue. If there are multiple failed jobs, each job is retried in turn without an intervening delay.
Keep History: If this option is enabled, successful finished jobs are kept to provide a complete history.
Please see the below screenshot for a sample configuration
Now Let's see an example by creating a sample Job using Sling Eventing.
To create a job we will implement JobExecutor. A job executor is a service processing a job. It registers itself as an OSGi service together with a property defining which topics this consumer can process. In place of JobExecutor, you can also use JobConsumer.
JobExecutor provides more functionality for the implementor (like tracking, logging, etc). JobConsumer is the preceding variant which allows you to implement a simpler interface if your implementation does not care about the additional features.
Internally the scheduled Jobs use the Commons Scheduler Service. But in addition, they are persisted (by default below /var/eventing/scheduled-jobs) and survive therefore even server restarts. When the scheduled time is reached, the job is automatically added as regular Sling Job through the JobManager.
If a job is in running state we can see it under var/eventing/jobs/assigned folder in AEM
If the job is failed it will move to var/eventing/jobs/canceled folder
if the job ran successfully it will move to var/eventing/jobs/finished folder

For any query and suggestion please comment or write us an email at rishabhy555@gmail.com
AEM provides a factory conguration which is responsible for this.
Go to your localhost:4502/system/console/configMgr and search for "Apache Sling Job Queue Configuration"
Provide the following field values:
Name: The name of the queue. If matching is used the token {0} can be used to substitute the real value.
Topics: This value is required and lists the topics processed by this queue. The value is a list of strings. If a string ends with a dot, all topics in exactly this package match. If the string ends with a star, all topics in this package and all subpackages match. If the string neither ends with a dot nor with a star, this is assumed to define an exact topic.
Type: The type of queue it can be parallel, ordered or Round Robin
Maximum Parallel Jobs: This will tell how many jobs can run in parallel. This value can be decided by the available number of processor
Maximum Retries: The maximum number of times a failed job slated for retries is actually retried. If a job has been retried this number of times and still fails, it is not rescheduled and assumed to have failed. The default value is 10.
Retry Delay: The number of milliseconds to sleep between two consecutive retries of a job which failed and was set to be retried. The default value is 2 seconds. This value is only relevant if there is a single failed job in the queue. If there are multiple failed jobs, each job is retried in turn without an intervening delay.
Keep History: If this option is enabled, successful finished jobs are kept to provide a complete history.
Please see the below screenshot for a sample configuration
Now Let's see an example by creating a sample Job using Sling Eventing.
To create a job we will implement JobExecutor. A job executor is a service processing a job. It registers itself as an OSGi service together with a property defining which topics this consumer can process. In place of JobExecutor, you can also use JobConsumer.
JobExecutor provides more functionality for the implementor (like tracking, logging, etc). JobConsumer is the preceding variant which allows you to implement a simpler interface if your implementation does not care about the additional features.
Internally the scheduled Jobs use the Commons Scheduler Service. But in addition, they are persisted (by default below /var/eventing/scheduled-jobs) and survive therefore even server restarts. When the scheduled time is reached, the job is automatically added as regular Sling Job through the JobManager.
If a job is in running state we can see it under var/eventing/jobs/assigned folder in AEM
If the job is failed it will move to var/eventing/jobs/canceled folder
if the job ran successfully it will move to var/eventing/jobs/finished folder

For any query and suggestion please comment or write us an email at rishabhy555@gmail.com